A stop loss is only useful if it sits in the right place. Too close, and normal price swings close the trade before the idea has a chance. Too far, and one bad trade costs far more than it should. This guide explains four common ways traders choose a stop loss level, with worked examples, and how to size the trade once the stop is set with the free position size calculator.
What is a stop loss and what does it protect?
A stop loss is a price level where you exit a trade to limit the loss. For a Long, it sits below your entry; for a Short, it sits above it. When the price reaches it, the position is closed.
A stop loss protects two things. It protects your account, because it caps the loss on a single trade. And it protects your decisions, because the exit is chosen calmly before the trade, not in a panic while the price is moving against you.
Why does "where the idea is wrong" matter more than a fixed percentage?
Every trade starts with a reason: "the price is holding support," "it broke out of a range," "the trend is up." The best stop loss is the price that would show that reason was wrong. If the price gets there, the setup no longer exists, so staying in the trade is just hoping.
A fixed percentage ignores the chart. A 3% stop may be fine on a calm coin and far too tight on a volatile one, where 3% moves happen several times a day. That is why most of the methods below start from the market itself, and only then measure the distance.
Method 1: How do you place a stop below support (or above resistance for shorts)?
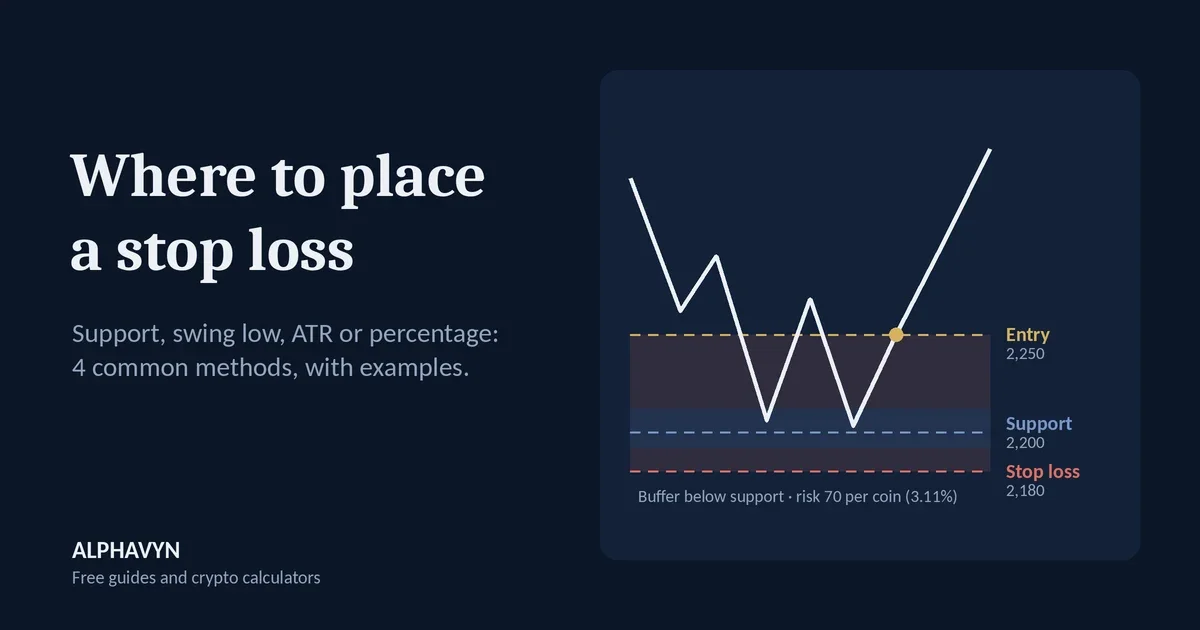
Support is a price area where buyers have stepped in before and the price has bounced. If you buy near support, the idea is "this level will hold." A stop just below that area makes sense, because a clear break of support means the idea failed.
Example (Long): support is around 2,200. You enter at 2,250 and place the stop at 2,180, a little below the support area. Your risk is 2,250 − 2,180 = 70 per coin, which is 3.11% of the entry price.
With a 1,000 USDT account and 1% risk (10 USDT), the position size is 10 ÷ 70 ≈ 0.143 coins, worth about 321 USDT.
New to these levels? Our beginner's guide to support and resistance in crypto explains how to find them.
For a Short, the logic is mirrored. Resistance is an area where sellers have pushed the price down before. If resistance is near 1.20 and you enter a Short at 1.15, a stop at 1.22 sits just above it. The risk is 0.07 per coin, about 6.09% of the entry.
The pair analyzer shows a quick structure reading for any USDT pair, which can help you check whether the price is trading near an important level before you plan the trade.
Method 2: How do you use the recent swing low or high?
A swing low is the lowest point of a recent pullback before the price turned up again. In an uptrend, the price makes higher swing lows. If the price falls below the most recent swing low, the pattern of higher lows is broken, and many traders see that as the trend weakening.
Example (Long): you enter at 50 after a pullback. The recent swing low is 47.80. A stop at 47.50, just below it, gives a risk of 2.50 per coin, or 5% of the entry.
For a Short in a downtrend, the stop goes just above the most recent swing high, the top of the last bounce.
Swing points work well when the trend is clear. In a choppy, sideways market, there may be no clean swing to use, and Method 1 or Method 3 often fits better.
To mark swing highs, swing lows, and support zones before you choose a stop, open our free live crypto charts and use the drawing tools.
Method 3: What is an ATR-based stop loss?
ATR (Average True Range) is an indicator that measures how much a coin typically moves in one period, such as one day. It was created by J. Welles Wilder, and StockCharts' ChartSchool explains that it is usually based on 14 periods. ATR does not show direction, only the size of normal moves.
An ATR stop places the stop a multiple of ATR away from the entry, so it adapts to how volatile the coin is right now. Common multiples are between 1 and 3 times ATR.
Example (Long): entry 42,000, daily ATR 1,680. Using 1.5 × ATR gives 1.5 × 1,680 = 2,520. The stop goes at 42,000 − 2,520 = 39,480, which is 6% below the entry.
When the market gets more volatile, ATR rises and the stop moves further away. This keeps the stop outside normal noise, but it also means fewer coins for the same risk. Position sizing handles this automatically.
Method 4: When does a simple percentage stop make sense?
A percentage stop is the simplest method: the stop sits a fixed percentage from the entry. With an entry of 100 and a 5% stop, the stop is at 95.
It makes sense when you are learning, when there is no clear level on the chart, or when you want a consistent rule while you test a strategy. Its weakness is that it ignores the market: the 95 level may fall right in the middle of normal price swings, or right above a support area where the price was likely to bounce.
A practical middle ground is to start with a percentage, then check the chart. If a support level or swing low sits just below your percentage stop, moving the stop slightly below that level usually makes more sense.
Once you know where your stop goes, the free stop loss and take profit calculator turns it into a stop price and shows take-profit prices at 1R, 1.5R, 2R and 3R.
Which stop loss method should you choose?
Method | Best for | Pros | Cons |
|---|---|---|---|
Below support / above resistance | Trades near clear levels | Matches the trade idea | Levels are areas, not exact prices |
Swing low / swing high | Trending markets | Clear rule based on structure | Unclear in sideways markets |
ATR multiple | Changing volatility | Adapts to current conditions | Needs an indicator and a chosen multiple |
Fixed percentage | Beginners, testing a rule | Simple and consistent | Ignores the chart |
There is no single best method. Many traders combine them: they look for a level (Method 1 or 2) and use ATR to check that the stop is not too tight for current volatility.
Why should you add a small buffer below obvious levels?
Round numbers and obvious levels attract a lot of stop orders. Prices often dip slightly below a well-known support level before bouncing, which can trigger stops placed exactly at the level.
A small buffer, such as placing the stop a little below the support area instead of right on it, gives the trade room to breathe. In the Method 1 example, the stop at 2,180 sits below the 2,200 support area rather than at 2,199. The buffer should be small: its job is to avoid normal noise, not to hide from a real breakdown.
Is liquidation the same as a stop loss?
No. Liquidation happens on leveraged positions when your margin can no longer cover the loss, and the position is closed automatically. It is not a level you chose based on your trade idea, and you can lose the whole margin.
With leverage, the liquidation price can sit closer to your entry than your stop loss, which means the position can be closed before your stop is ever reached. ALPHAVYN does not recommend using leverage. You can see how close liquidation can be in the liquidation calculator.
What should you do after choosing your stop?
Size the trade. The stop distance decides how many coins you can buy for your chosen risk:
Position size = amount at risk ÷ stop distance
A wider stop means fewer coins, and a tighter stop means more coins, but the loss at the stop stays the same. Our guide on how to calculate position size in crypto walks through this step by step, and the position size calculator does it instantly.
To put the entry, stop loss, targets and size together, see our guide on how to plan a crypto trade.
Frequently asked questions
What is the difference between a stop-market and a stop-limit order?
A stop-market order becomes a market order when the stop price is reached, so it exits at the next available price, which may be worse than your stop in a fast market. A stop-limit order becomes a limit order, so it will not fill below your limit price, but it may not fill at all if the price moves past it. The U.S. SEC explains both in its investor bulletin on stop orders.
Should I move my stop loss?
Moving a stop further away to avoid a loss turns a planned loss into an unplanned one, and most traders consider it a mistake. Moving a stop closer in the direction of the trade, for example to the entry price after TP1 is reached, is a common way to protect a trade that is already in profit.
What is a trailing stop?
A trailing stop follows the price as it moves in your favor, at a fixed distance or percentage. With an entry at 100 and a 10% trailing stop, the stop starts at 90. If the price rises to 120, the stop moves up to 108. If the price then falls, the stop stays at 108.
Some traders use the Supertrend line as a trailing stop; our guide to the Supertrend indicator in crypto explains how it works.
How far should my stop loss be?
There is no fixed answer. The stop should sit where your idea is wrong, with a small buffer. If that distance makes the position too small or too large for your account, adjust your risk per trade or skip the setup, rather than moving the stop to an arbitrary level.
Once your stop is set, enter your numbers in the position size calculator so the trade risks exactly what you planned.